Ceramic Tile Installation Guide: Expert Tips for Durable, Stylish Floors
You want a durable, low-maintenance surface that suits kitchens, bathrooms, and high-traffic spaces while offering near-endless styles. Ceramic tile gives you long-lasting performance, wide water resistance, and design flexibility so you can match any aesthetic from classic subway to textured stone looks.
This post will show what makes ceramic tile different from other surfaces, the advantages it brings to your home, and what to consider when planning installation and upkeep. Expect clear guidance on materials, finishes, and practical installation choices so you can choose and install tile with confidence.
Key Features and Advantages
Ceramic tiles deliver long service life, low upkeep, and a wide range of colors, patterns, and finishes that fit specific room uses and design goals. You’ll find options suited for high-traffic floors, wet areas, and decorative walls without sacrificing performance.
Durability and Longevity
Ceramic tile is made from fired natural clay, which creates a hard, wear-resistant surface that withstands daily foot traffic. For floors, expect high breaking strength and resistance to scratching when you choose tiles rated for commercial or residential use.
Glazed ceramic adds a protective layer that reduces wear and staining; unglazed porcelain-style ceramics offer greater density and moisture resistance. Proper installation—stable substrate, correct thinset, and grout joints—matters as much as the tile grade for avoiding cracks and long-term issues.
Tile edges and thickness vary by application. Choose thicker, PEI-rated tiles for entryways and kitchens; lighter wall tiles work well for backsplashes and showers. With correct installation and occasional grout repair, you can reasonably expect decades of service.
Maintenance and Cleaning
Ceramic tile requires routine sweeping and periodic mopping to remove dirt and prevent abrasive wear on the glaze. Use a neutral-pH cleaner for regular cleaning; avoid harsh acids or strong alkalis that can dull the glaze or damage grout.
Grout is the most maintenance-prone element; seal grout after installation and re-seal every 1–3 years in wet areas to reduce staining and mold growth. For stubborn stains, a soft-bristle brush and a paste of baking soda and water usually lift residue without harming the tile.
Repair is localized: damaged tiles can be replaced individually if you retain spare tiles. That makes long-term upkeep practical and often less expensive than replacing broad swathes of laminate or wood flooring.
Variety in Colors and Designs
Ceramic tile offers virtually unlimited visual options through glazes, surface textures, and printing technologies. You can select solid colors, realistic wood or stone looks, geometric patterns, and custom murals to match precise design palettes.
Tile sizes range from small mosaics (1 in) to large-format slabs (up to 48 in), letting you control grout line visibility and pattern scale. Surface finishes include matte, semi-gloss, and high-gloss, plus textured anti-slip options suitable for wet areas.
You can mix and match field tiles, trim pieces, and decorative accents to create transitions or focal points. When buying, keep extra boxes of the same dye lot to ensure color consistency for future repairs or extensions.
Installation Methods and Considerations
You need a flat, clean substrate, correct adhesive and grout, and attention to movement joints and tile layout to avoid failures. Proper tools and mixing ratios matter as much as technique.
Surface Preparation
Remove old flooring, adhesives, grease, and loose material before you begin. Check flatness with a 10-foot straightedge: tolerance should be about 1/4″ in 10′ for standard tiles and 1/8″ in 10′ for large-format tiles.
Repair hollow spots, cracks, and uneven areas with a suitable patch or self-leveling compound. On concrete, test for moisture and use a vapor barrier or moisture-tolerant thinset if RH or MVER exceeds adhesive limits.
Prime porous or dusty substrates to improve adhesion. Use a cement backer board (CBU) on wood subfloors or ensure the subfloor has sufficient stiffness and joist spacing to prevent deflection.
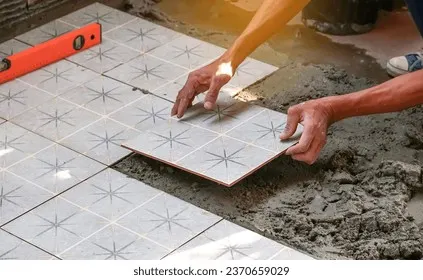
Dry-fit tiles and plan layout to minimize small edge cuts; snap chalk lines to keep rows straight. Leave space for movement joints at perimeters, changes in plane, and long runs to accommodate thermal and structural movement.
Grouting Techniques
Choose grout type by joint width and exposure: unsanded for joints under 1/8″, sanded for wider joints, and epoxy grout for high-moisture or chemical resistance. Mix grout to the manufacturer’s specified consistency; overwatering weakens strength and increases shrinkage.
Apply grout with a rubber float held at a 45° angle, forcing grout into joints and removing excess by scraping diagonally across tiles. Wait the manufacturer’s initial set time, then perform a first clean with a damp sponge using diagonal strokes to avoid pulling grout from joints.
After grout cures, perform a final wash and buff to remove haze. Seal cementitious grout if recommended to reduce staining and water ingress; epoxy grouts generally do not require sealing. Allow appropriate cure times before heavy traffic or immersion—typically 24–72 hours depending on product and conditions.
Professional vs. DIY Installation
Hire a pro when substrates need structural repair, when large-format tiles or natural stone are used, or when warranties require certified installation. Professionals bring specialized tools (large tile cutters, trowel leveling systems, moisture testing equipment) and experience with complex layouts and movement joint placement.
DIY works well for small areas, simple layouts, and standard ceramic tiles if you follow surface-prep, adhesive selection, and grout instructions precisely. Budget for quality tools: tile spacers, notched trowels sized to tile, a wet saw for straight cuts, and a level.
Consider labor cost, risk of rework, and time. If you value a flawless finish, tight grout lines, and long-term durability, professional installation often gives better consistency and warranty protection.